Category: Uncategorized

  • Foil, Deboss, Screen Print, or Digital: How to Put Your Logo on a Menu Cover

    Foil, Deboss, Screen Print, or Digital: How to Put Your Logo on a Menu Cover

    Two menu covers can use the same leatherette and the same stitching and still land very differently on the table, and the reason is almost always the logo. How your mark is applied decides whether it reads as quiet and expensive or bright and legible from across a dim room, how many colors it can carry, and how the price behaves as your order grows. There are four decoration methods that cover nearly every restaurant order, and each one suits a different combination of material, budget, and run size. Here is how they compare and how to choose.

    The four ways a logo gets onto a cover

    The realistic menu is short. Hot foil stamping presses heated metallic or pigment foil into the surface for a bright, reflective mark. Blind debossing stamps the logo into the material with no ink at all, leaving a recessed, tone-on-tone impression. Screen printing pushes opaque ink through a stencil for flat, solid color, one screen per color. Digital printing lays down full-color, photographic artwork directly, with no die or screen to make. Everything else you will be offered is a variation on one of these four. The trade-offs among them fall along three axes: the look, the number of colors, and how the cost scales with quantity.

    Hot foil stamping: shine that needs a die

    Foil stamping is the method most people picture when they think of an upscale menu. A metal die, engraved with your logo, is heated and pressed through a thin foil so the design transfers onto the cover with a crisp metallic or matte finish. The palette is broad in the sense that foils come in gold, silver, copper, black, white, and even pearl or holographic finishes, but each foil color is a separate pass, so a two-color foil logo means two dies and two hits. Foil sits well on leather, leatherette, and vinyl, and it is genuinely durable because the image is pressed into the surface rather than sitting on top of it. The catch is the one-time die. That tooling cost is charged up front and does not repeat on reorders, which is why foil rewards larger runs, as the first chart makes clear. On a short run the die dominates the price; on a big run it is a rounding error.
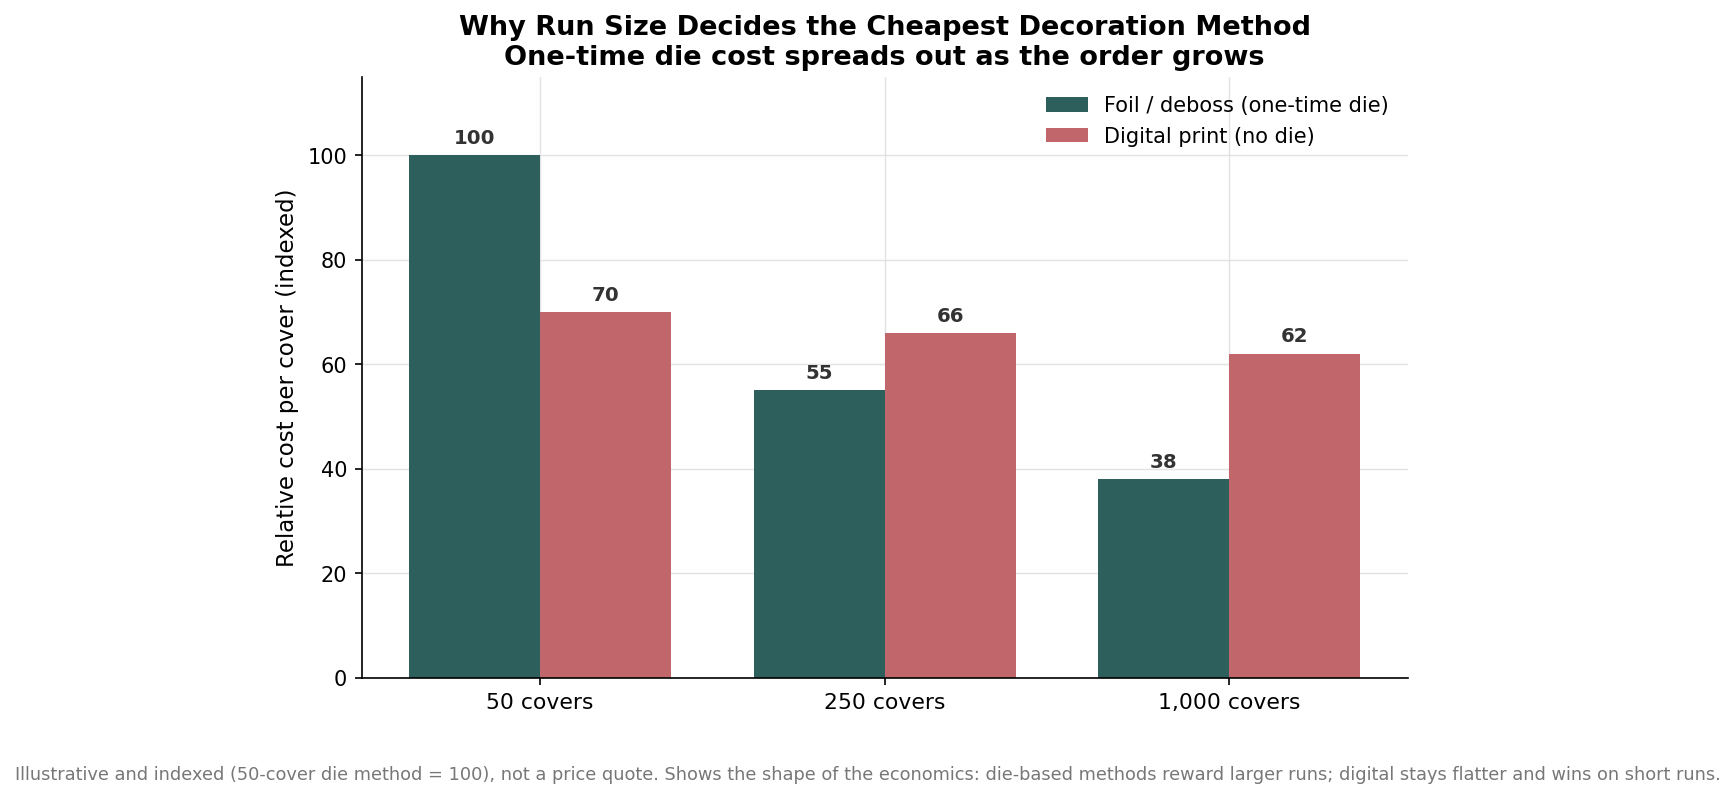
    Grouped bar chart of relative cost per menu cover at 50, 250, and 1,000 covers for die-based versus digital decoration
    Illustrative economics: a one-time die makes foil and deboss reward larger runs, while digital stays flatter.

    Because foil pricing typically tracks the stamped area and coverage, a compact logo stamps far more economically than a large crest that fills the front panel. If you love the metallic look but the design is big, ask whether it can be simplified or scaled down before you commit to the die.

    Blind deboss and emboss: texture instead of ink

    Blind debossing uses the same kind of die as foil, but with no foil loaded, so the logo is simply pressed into the material. The result is a recessed, monochromatic mark that catches light at the edges. On many leatherette and bonded materials the pressure and heat also darken the impression slightly, creating a burnished effect that looks richer than a flat print. Embossing is the same idea in reverse, raising the logo instead of recessing it. This is the most understated option, and it is a favorite for fine dining and boutique hotels precisely because it adds no color and draws no attention to itself. It shares foil’s economics: a die is required, so it makes the most sense once your run is large enough to spread that tooling cost. Because it carries no ink, it is also the most forgiving to keep clean over a cover’s life, since there is no printed layer to scuff or peel.

    Screen printing and digital: color at two different scales

    When the logo needs actual color, the choice narrows to screen printing and digital, and the deciding factors are how many colors you need and how the artwork looks. Screen printing lays down flat, opaque ink and is the workhorse for simple marks on vinyl and poly covers. It handles solid shapes and text cleanly and is cost-effective at volume, but it is practically limited to roughly four colors because every color needs its own screen and its own pass. Fine gradients and photographic detail are beyond it. Digital printing removes that ceiling entirely, reproducing continuous-tone, full-color artwork with gradients and photographs directly onto suitable materials, with no die or screen to make. The second chart lines up the color ceilings side by side.
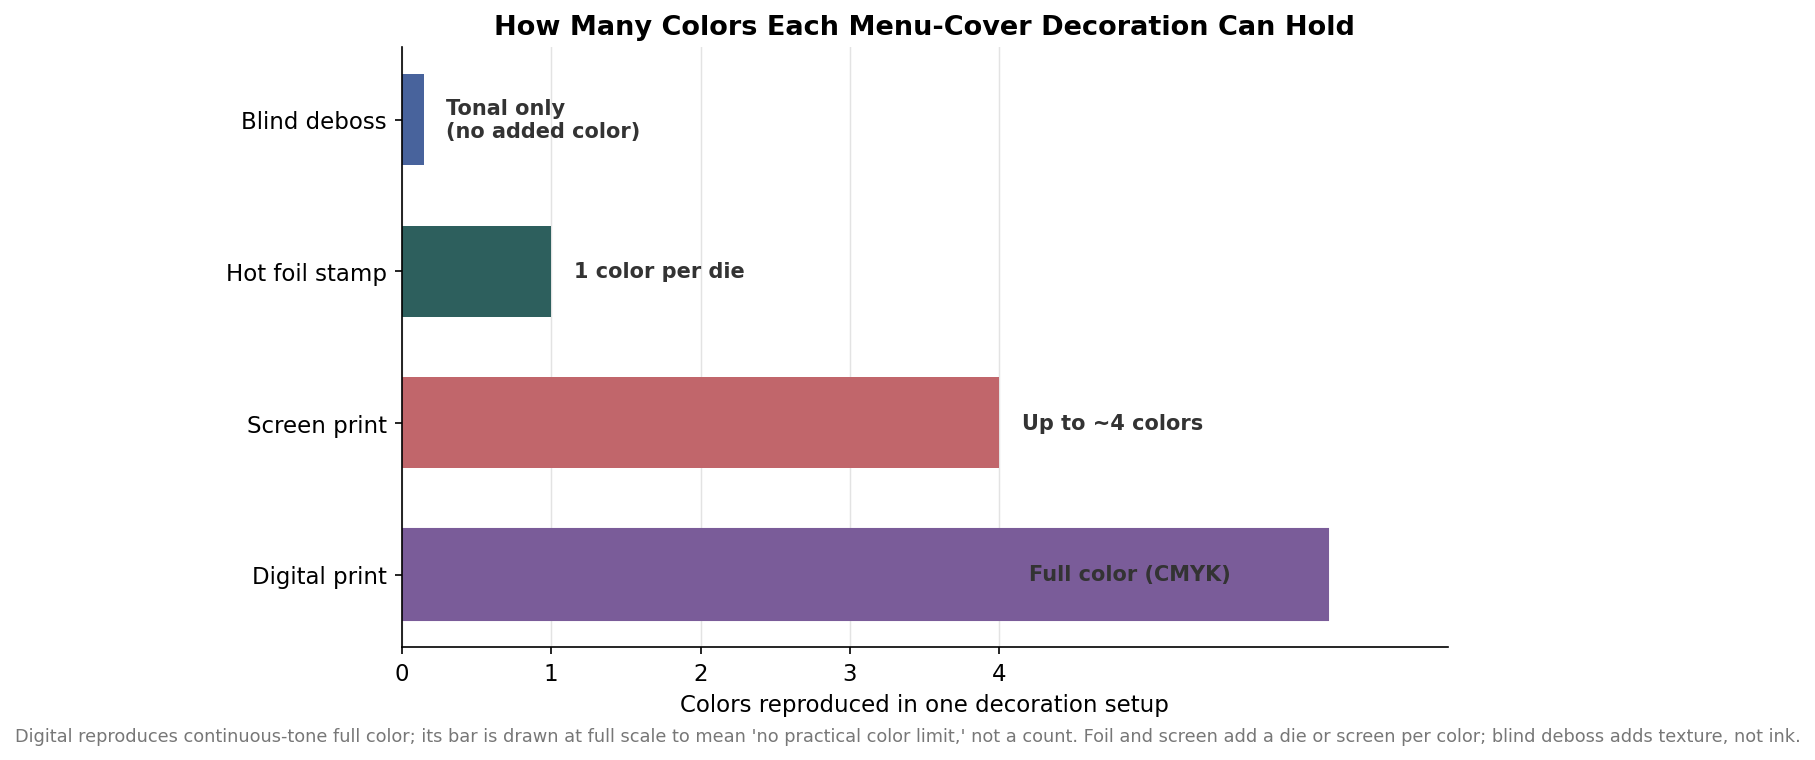
    Horizontal bar chart comparing colors per decoration setup for blind deboss, foil stamping, screen printing, and digital printing
    Color ceilings by method: deboss adds none, foil one per die, screen up to about four, digital full color.

    Because digital carries no tooling cost, it is the natural choice for short runs, complex logos, and covers that need more than a few colors. Screen printing tends to pull ahead on cost for large quantities of a simple, low-color mark. And neither one gives you the pressed-in tactile quality of foil or deboss, which is a look, not just a color.

    Matching method to material, budget, and run size

    Start with the material, because it quietly rules some methods out. Foil and deboss want leather, leatherette, or a quality bonded surface that takes a clean impression. Screen printing and digital are happiest on vinyl, poly, and plastic covers built for ink. Next, weigh the look you want against your color count: choose deboss for the most restrained, tone-on-tone impression, foil for metallic impact in one or two colors, screen printing for a few flat colors on a plastic cover, and digital when the logo is full-color or photographic. Finally, let run size settle the economics. A one-time die on foil or deboss is a poor trade for fifty covers and an easy one for a thousand, while digital’s lack of tooling makes it the safer pick for small or first-time orders where you are still refining the design.

    Two practical notes before you order. Ask for a physical proof or a stamped sample whenever a die is involved, because a logo that looks fine on screen can lose fine lines when it is engraved and pressed. Lead times for decorated covers commonly run in the range of one to three weeks from approved artwork depending on method, quantity, and whether tooling has to be cut, and that window is indicative rather than a fixed promise. Get the method right for your material, your palette, and your volume, and the cover does exactly what it should: it carries your name the way you want it read.
  • How to Clean and Sanitize Menu Covers by Material

    How to Clean and Sanitize Menu Covers by Material

    The disinfectant that protects your guests is often the same thing that destroys your menu covers. A cover that gets wiped with a bleach spray or a straight alcohol pad several times a day will look tired in months, not years, and the print is usually the first thing to go. The fix is not to clean less. It is to match the cleaner to the material, and to separate the quick between-guests wipe from the deeper clean that actually resets the surface.

    This guide walks through both routines and then goes material by material, because a laminated plastic panel, a coated vinyl cover, a leatherette (polyurethane) folder and a genuine leather book each want something different. Getting this right is the cheapest durability upgrade you will ever make, since it costs nothing beyond choosing the correct bottle.

    The quick wipe and the deep clean are two different jobs

    Most damage comes from treating every clean like a disinfection event. For high-touch service, a between-guests wipe only needs to remove visible soil and knock down surface germs: a soft microfiber cloth, lightly dampened, and where a sanitizer is required, a 70% alcohol wipe used briefly rather than soaked on. Wipe in the direction of any grain, let it flash off, and move on. Reserve the deep clean for the end of a shift or a slow afternoon: warm water with a drop of mild dish soap, a well-wrung cloth, then a second pass with a clean damp cloth to lift any soap film, and full air drying before the cover goes back into rotation.

    Frequency depends on touch, not on the calendar. A busy diner passing covers through hundreds of hands a day should plan on a between-guests wipe every turn and a deep clean daily. A fine-dining room that presents a menu a handful of times per table can deep clean weekly and spot clean as needed. The mistake is letting food oils and hand lotion build into a haze, because once that film sets, people reach for something stronger, and stronger is what shortens the cover’s life.

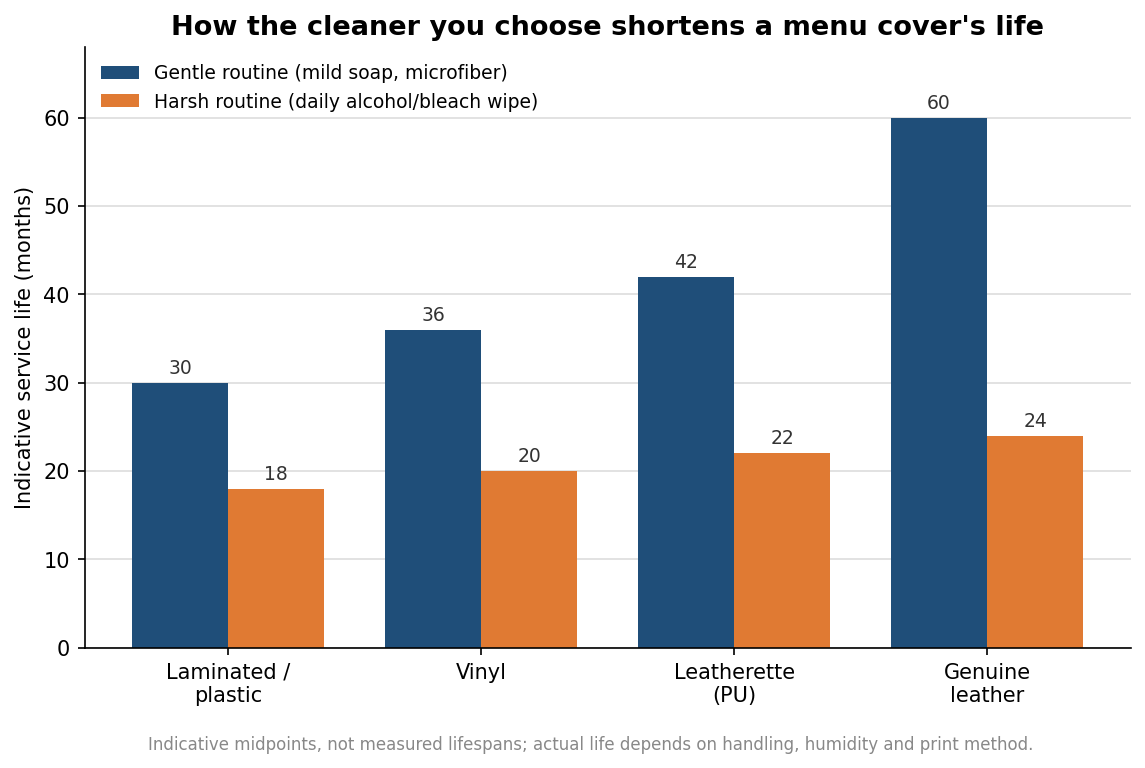
    Grouped bar chart of indicative menu cover service life in months by material under a gentle cleaning routine versus a harsh daily alcohol or bleach routine
    Harsh daily disinfecting can cut a cover’s service life by half or more, and hits genuine leather hardest.

    Match the cleaner to the cover material

    Laminated and rigid plastic covers are the most forgiving surface in the dining room. They tolerate warm soapy water, most sanitizing wipes and an occasional 70% alcohol pass. Their weak point is not the face but the edges and seams, where liquid wicks in behind the lamination and lifts it. Keep water away from cut edges, never soak them, and dry the perimeter first.

    Coated vinyl behaves similarly and is built for volume service. Mild soap and water is the everyday answer. It handles brief alcohol sanitizing better than leather does, but repeated saturated alcohol still hazes the topcoat over time and can dull a printed logo, so treat alcohol as an occasional tool rather than the default.

    Leatherette, the polyurethane material most custom covers are made from, wants the gentlest realistic routine: a barely damp microfiber cloth with a little mild soap, wiped and then dried. Avoid solvents, avoid scrubbing at a stain, and blot spills quickly before they sit. Leatherette does not need conditioner the way hide does; oils and “leather” creams can leave a tacky residue that then grabs dust.

    Genuine leather is the most rewarding and the least tolerant of harsh chemistry. Dust it, wipe occasional marks with a slightly damp cloth, and condition it a couple of times a year with a product made for finished leather. What it cannot take is alcohol, which strips the finish and dries the hide until it cracks. If a leather cover must be sanitized, wipe quickly with the mildest effective product, dry it, and re-condition on schedule rather than trying to soak the surface clean.

    What quietly destroys menu covers

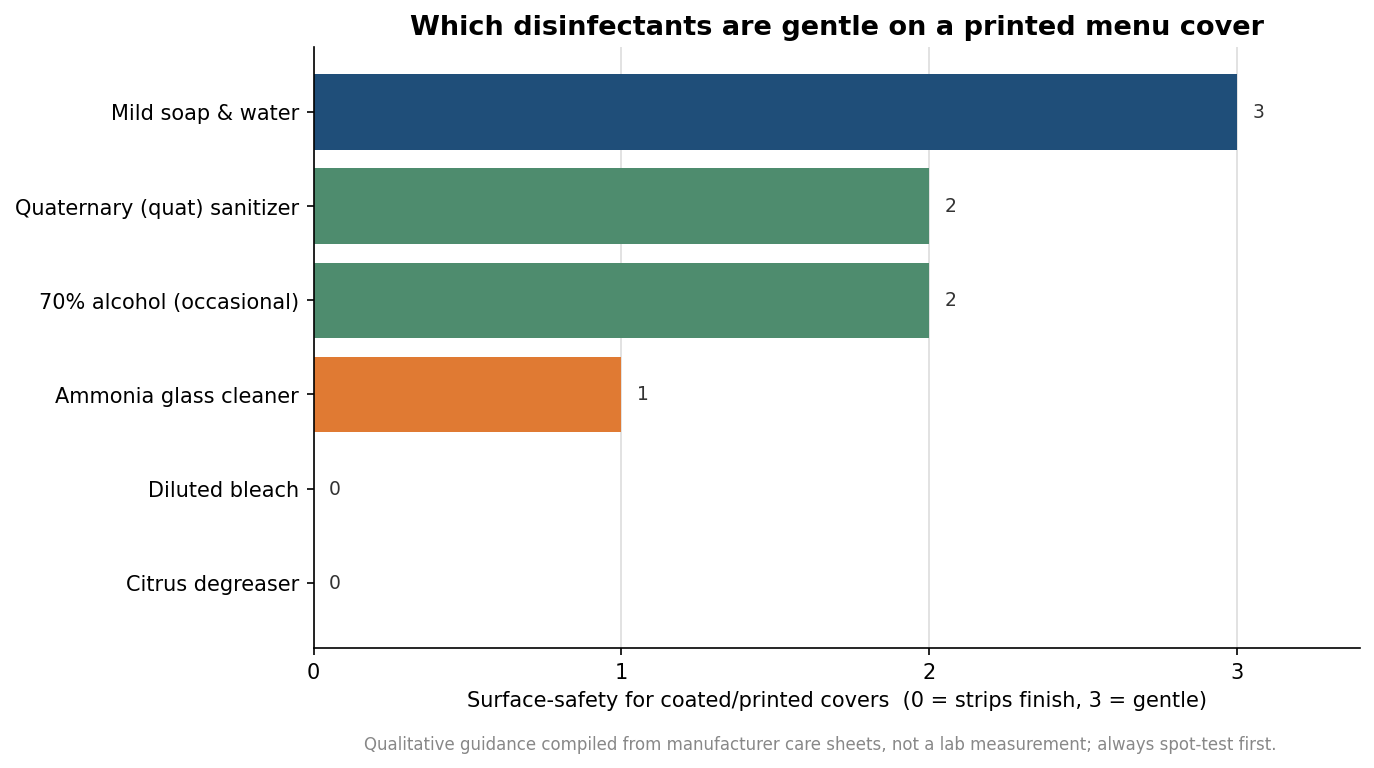
    A handful of habits account for most premature replacements. Bleach and ammonia glass cleaners strip coatings and fade print with repeated use. Citrus degreasers and other solvent-heavy sprays cut oils beautifully and take the finish with them. Abrasive pads and “magic” eraser sponges physically sand the topcoat, leaving a dull patch exactly where the light hits. Soaking anything, or letting water pool at a seam, breaks the bond between layers. And heat from a dishwasher, a hot line or a sunny window sill will warp and yellow plastics and dry out leather. If you take only one rule from this section, make it this: never spray cleaner directly onto the cover. Spray the cloth, wipe the cover, and you avoid the pooling and overspray that do the real harm.

    Horizontal bar chart rating the surface-safety of common disinfectants on coated printed menu covers, from mild soap and water down to citrus degreaser
    Mild soap and occasional 70% alcohol are gentle on printed covers; bleach, ammonia and citrus degreasers strip the finish.

    How your cleaning routine shows up in the budget

    Cleaning choices are really a replacement-cost decision in disguise. The same cover can last two to three times longer under a gentle routine than under daily harsh wiping, which means the line item you notice, reordering covers, is partly set by the bottle you keep at the host stand. When you compare cleaners, weigh the modest cost of mild soap and 70% alcohol against the cover you would otherwise replace early, and the math favors gentleness every time.

    A practical setup for most rooms is three things within reach: a stack of clean microfiber cloths, a spray bottle of warm water with a trace of mild dish soap for deep cleans, and a tub of 70% alcohol wipes for sanitizing when it is genuinely required. Keep bleach, ammonia, citrus degreasers and abrasive sponges away from the covers entirely. Spot-test any new product on a corner or a spare cover before you commit, because finishes and print methods vary, and the corner is where you want to discover a problem, not the front panel a guest is holding.

    Handled this way, sanitizing and longevity stop being in tension. Guests get a clean, presentable menu every time, and you get covers that reach the end of their design life instead of aging out early because the wrong spray sat within arm’s reach.

  • Your Menu Covers Are Dying at the Edge, Not the Panel

    Covers wiped between every guest fail in a specific and predictable place, and it is almost never the surface everybody inspects.

    What a sealed edge actually is

    Two layers closed with heat or paint, which leaves a seam along every side.

    A turned-and-stitched edge folds the material back on itself: no seam to open.

    What the sanitiser does to it

    Alcohol and quaternary solutions creep into a seam by capillary action.

    Once inside, the layers separate from the middle out, where no cloth reaches.

    Why it looks fine until it does not

    The face of the panel is unmarked, so nobody inspects the perimeter.

    By the time an edge lifts visibly, the delamination has run some way in.

    What to do about it

    Tell your supplier what is in the bottle, and specify the edge against it.

    In a heavy-wipe room, pay for stitched edges. It is the cheapest life extension there is.

  • The Complete Buyer’s Guide to Custom Menu Covers

    A menu cover is a simple object with four decisions in it, and three of them are usually made by whoever is filling in the order form.

    Start with the insert, not the size

    Send the actual sheet. Letter is not A4 and a trimmed sheet is neither.

    Say whether it is laminated: the finished thickness changes the pocket.

    Choose the attachment by who reloads it

    Tool-free slits and pockets for weekly changes by whoever is on shift.

    Screw posts only where the page count genuinely moves. Cords where the paper must survive.

    Ask how the edge is made

    Turned and stitched has no seam. Heat-sealed and painted edges do.

    In a room that sanitises between guests, that seam is the countdown.

    Quote the opened width

    Three panels on a letter insert open past two feet.

    Measure your smallest table before you choose a fold-out.

    And ask for the failure mode

    Any supplier who cannot tell you how their mechanism fails has not thought about it.

  • Slits, Posts, Cords or Pockets: Which Menu Cover Attachment to Buy

    There is no best attachment. There is only the one that matches how the cover will actually be reloaded, and by whom.

    Corner slits

    Fastest and cheapest, tool-free. Loads the sheet at four points.

    Tears the paper at a corner first, especially on uncoated stock.

    Top-load pockets

    Spreads the load along a whole edge, so the sheet lasts far longer.

    Slower to reload, and the window is then the wear part.

    Screw posts

    The only mechanism that takes a change in page count.

    Gets stripped by a hurried reload. Buy spares and a coin-turn head.

    Elastic cords

    Gentlest on the paper: nothing punctures or grips the sheet.

    Relaxes with cycles and heat until it will not hold one thin sheet.

    So ask one question

    Who reloads it, and how often? Everything else follows from the answer.

  • How to Specify Restaurant Menu Covers: Sizes, Panels, and Binding

    How to Specify Restaurant Menu Covers: Sizes, Panels, and Binding

    A menu cover has a job that sounds simple and turns out to have half a dozen decisions hidden inside it: hold your printed menu, survive months of handling, and let a server swap a page when a price changes or a dish sells out. Specify it well and it does all three quietly for years. Specify it loosely and you end up with covers that fit the wrong sheet, bind in a way that fights your update schedule, or look heavier or flimsier than the room calls for. Here is how to work through the specification in the order that actually matters.

    Start with the insert size, because everything follows from it

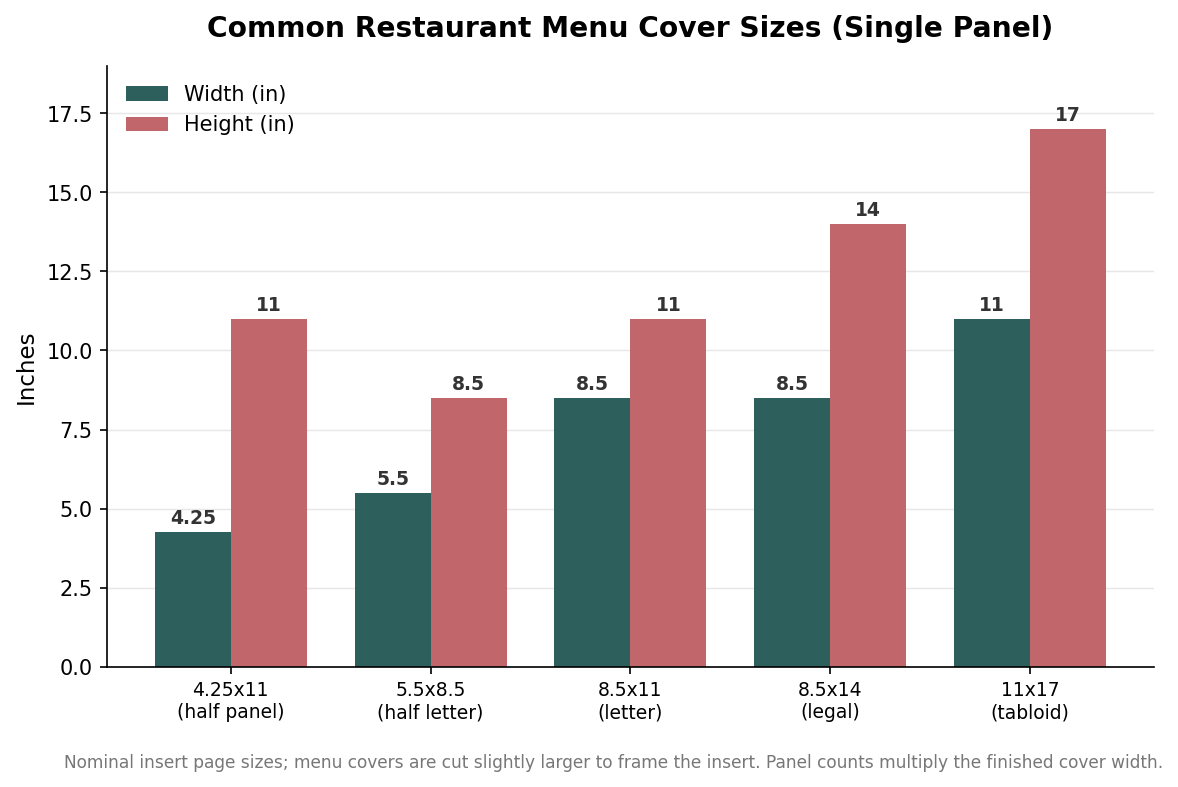
    The first number to lock down is the size of the printed sheet the cover has to hold, since the cover is built around it. Letter, at 8.5 by 11 inches, is the versatile default and the easiest size to print in-house or at any shop. Legal, at 8.5 by 14, buys you extra vertical room for a longer food list without going to multiple panels. Half sizes such as 5.5 by 8.5 or a tall 4.25 by 11 suit compact food menus, cocktail lists, and dessert or beverage cards that live alongside the main menu. At the large end, tabloid at 11 by 17 gives an oversized single spread for venues that want the menu to read as a display piece. Decide this before anything else, because the cover is cut slightly larger than the insert to frame it, and every downstream choice assumes a fixed sheet size.

    Grouped bar chart of common restaurant menu cover sizes showing width and height in inches for half panel, half letter, letter, legal, and tabloid
    Common single-panel insert sizes; the finished cover is cut slightly larger to frame the sheet.

    Choose the panel count to match how much you list

    Once the sheet size is set, the number of panels or views determines total menu real estate. A single-panel cover shows one sheet, front and back, and reads as clean and minimal. A two-view opens like a folder to show two facing pages, which is the most common full-service format. Three-view and four-view configurations, sometimes built as gatefolds or booklets, hold three or four pages for larger menus that separate starters, mains, and drinks. Beyond that, multi-page formats using cords, rings, or bolts hold five or more pages for wine books and expanding lists. The rule of thumb is to size for your current menu plus one page of headroom, so a seasonal addition does not force a reprint of the whole cover format. It also helps to think about how the cover is handed to the guest: a single or two-view sits flat on the table and is easy for a server to carry a stack of, while a four-view or booklet reads as a more deliberate, higher-touch presentation that fits a slower dining pace.

    The binding style is really a decision about updates

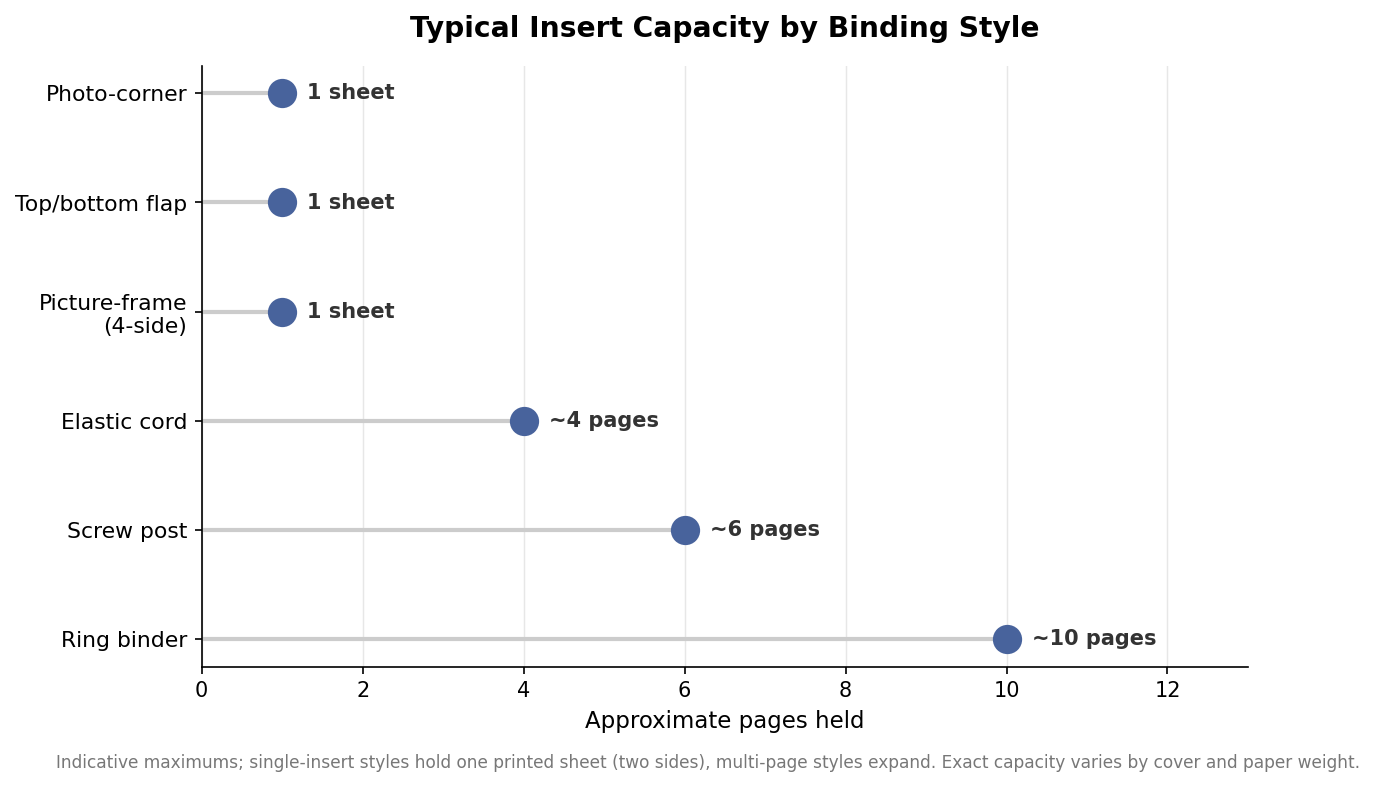
    How the insert attaches to the cover looks like a cosmetic choice but is mostly about how often you change pages and how many you carry. Photo-corner and top-or-bottom flap styles hold a single sheet and let a server swap it in seconds, which is why they dominate in places that reprint daily specials. A picture-frame style that grips all four sides looks the most finished and holds the insert most securely, at the cost of a slightly slower change. When you need to carry several pages, the choice shifts to elastic cord, screw post, or ring binding. Elastic cord holds a small booklet and flexes as you add sheets; exterior screw posts let staff add or remove pages without opening the cover; ring binders carry the most pages and take the heaviest use, which is why they are the standard for wine and drink books.

    Dot plot of approximate insert capacity by binding style, from single-sheet photo-corner and flap styles up to about ten pages for ring binders
    Single-insert styles favor fast page swaps; cord, screw post, and ring bindings carry multi-page menus.

    Read the chart above as a planning tool rather than a hard limit. The single-insert styles are built to hold one printed sheet showing two sides, and they are the right answer whenever your priority is a fast, tool-free page swap. The multi-page styles trade a little change-speed for capacity, and the practical maximum depends on the paper weight you print on, since heavier stock fills a binding faster than thin sheets.

    Match the material and weight to the room

    Material sets the durability and the impression, and it interacts with the format you have already chosen. Genuine leather and leatherette carry a premium, hospitality-grade feel and hold up to years of handling, while heavy vinyl and reinforced synthetics wipe clean and shrug off spills, which matters in high-turnover and outdoor-adjacent settings. A heavier cover reads as more upscale but adds weight that servers notice across a full shift, so a fine-dining captain’s book and a fast-casual table menu genuinely call for different builds. If your menus see food, moisture, and constant handling, a wipeable surface and a secure four-side or screw binding will outlast a delicate corner-mounted sheet, regardless of how nice the latter looks on day one.

    Confirm the details before you order

    Before you commit a run, put the full specification on one line so nothing is assumed: insert size in inches, panel or view count, binding style, material and color, and any imprint such as a logo blind-debossed or foil-stamped on the front. Confirm whether the quoted size is the insert size or the finished cover size, since the cover is always a little larger, and confirm that the inserts you plan to print will actually seat in the binding you chose. If several people at your venue will be swapping pages, factor in how tool-friendly the binding is, since an exterior screw post or a simple flap keeps updates in the hands of floor staff while an internal screw build may need a manager and a screwdriver. It is worth ordering a single sample in your intended material and binding before a full quantity, because a cover is something guests touch on every visit, and the difference between a good specification and a loose one shows up in exactly that moment.

  • Leather, Leatherette, or Vinyl: How to Choose Restaurant Menu Covers

    Leather, Leatherette, or Vinyl: How to Choose Restaurant Menu Covers

    The material a menu cover is made from changes almost everything about it: how it feels in a guest’s hands, how long it survives a busy service, how often it needs replacing, and what it signals about the room before anyone reads a word. Before you order a stack of leather menu covers or default to the cheapest clear pocket, it helps to understand what actually separates the options and where each one earns its price.

    The three materials behind most restaurant menu covers

    Nearly every cover on the market is built from one of three families. Clear vinyl and PVC sleeves are the workhorses: a printed insert slides into a transparent pocket that wipes clean in a second and shrugs off spilled sauce and condensation. They photograph as “plastic,” which is exactly right for a high-volume diner, a cafe counter, or a laminated drink list that changes weekly. Leatherette, also sold as faux leather or leatherette, is a rigid board wrapped in a coated vinyl or bonded skin. It holds a square, structured shape, comes in a wide range of colors and stitched-edge finishes, and takes a foil-stamped logo cleanly, which is why it dominates casual and family restaurants. Genuine leather sits at the top: softer in the hand, warmer in tone, and able to develop a patina, it reads as fine dining the moment a guest picks it up.

    The trade-off is not just cost. Vinyl and leatherette are the easiest to sanitize between guests because a damp cloth is all they need, while real leather asks for a dry wipe and the occasional conditioner and does not love standing water. If your covers live near an ice well or an outdoor patio, that maintenance difference matters more than the look.

    Matching size and view count to your menu

    Menu covers are built around standard paper sizes, so the first decision is which insert you are printing. The common full sizes are 8.5 x 11 inches (letter), 8.5 x 14 inches (legal, a favorite for wine and cocktail lists because it gives long vintage columns room to breathe), and 11 x 17 inches (tabloid) for large all-day menus. Slimmer formats such as 4.25 x 11 and 4.25 x 14 inches suit a narrow beer or dessert list that sits upright on the table, and the half-letter 5.5 x 8.5 inch size is popular for cafes and daily specials.

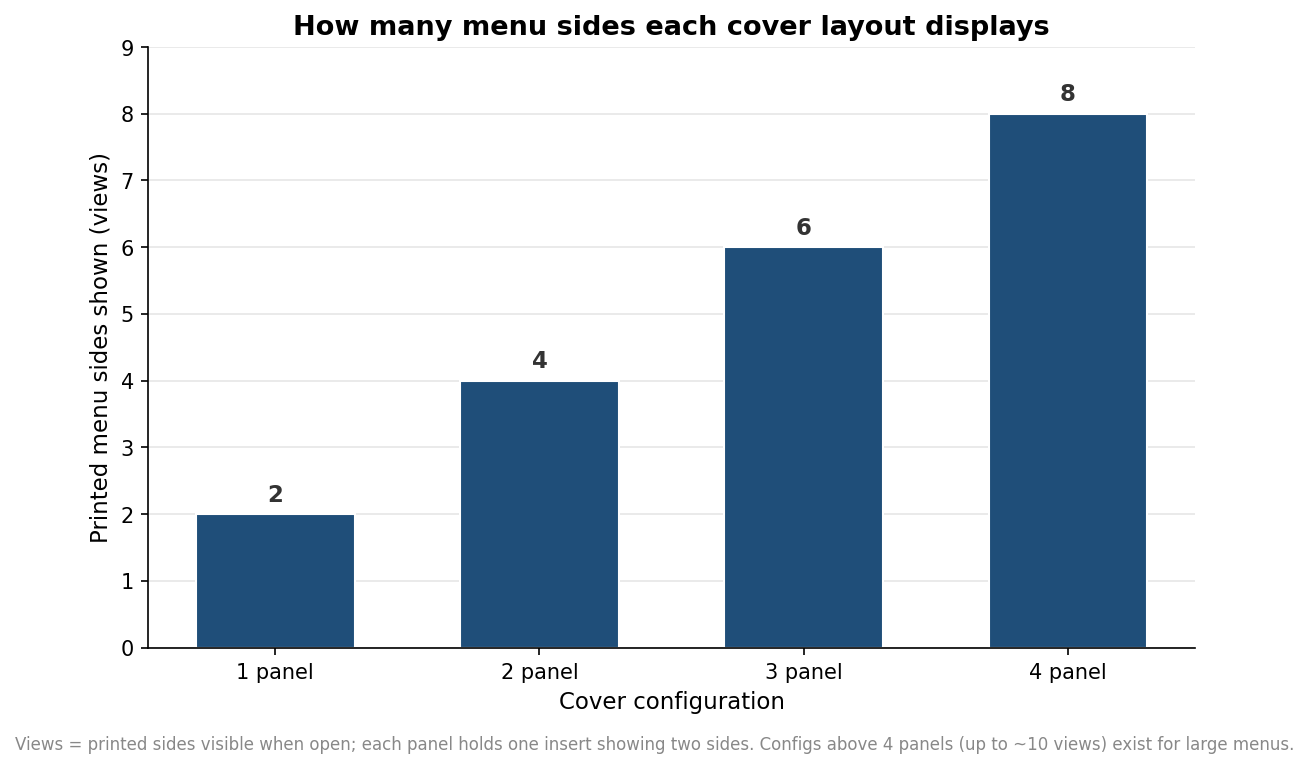
    Once the size is set, the number of panels decides how much menu you can show. A single panel displays two views, the front and back of one insert. A two-panel cover opens like a book for four views, a three-panel booklet reaches six, and larger booklets with strap or cord binding climb toward eight or ten views for a full food-and-beverage program. The chart below shows how views scale with panels, which is the fastest way to sanity-check whether your menu fits before you order.

    Bar chart showing menu views by cover configuration: one panel two views, two panel four, three panel six, four panel eight
    Menu views scale with panel count, from two views on a single panel to eight on a four-panel booklet.

    A useful rule of thumb: count the pages your current menu actually needs, add one for seasonal inserts, and round up to the next panel count. Ordering a cover that is one view too small is the most common reason a restaurant reprints within a year.

    How the pages actually attach

    The insert has to stay put, and the attachment method affects both durability and how quickly your staff can swap a menu. The default on most covers is four photo-album corners that grip each sheet at the edges; they are cheap, fast to change, and fine for a menu you update often. Sewn-in bands or clear strips hold the sheet along a whole edge and look tidier for a permanent menu. For covers that take real abuse, exposed or hidden screw posts and elastic cords lock inserts in hard and let you rebuild a booklet page by page, while sewn edges around the whole cover add stiffness and a finished border. If you reprint your menu monthly, favor corners or bands; if the menu rarely changes, screws and sewn construction will outlast them.

    What you’ll pay, and where the money goes

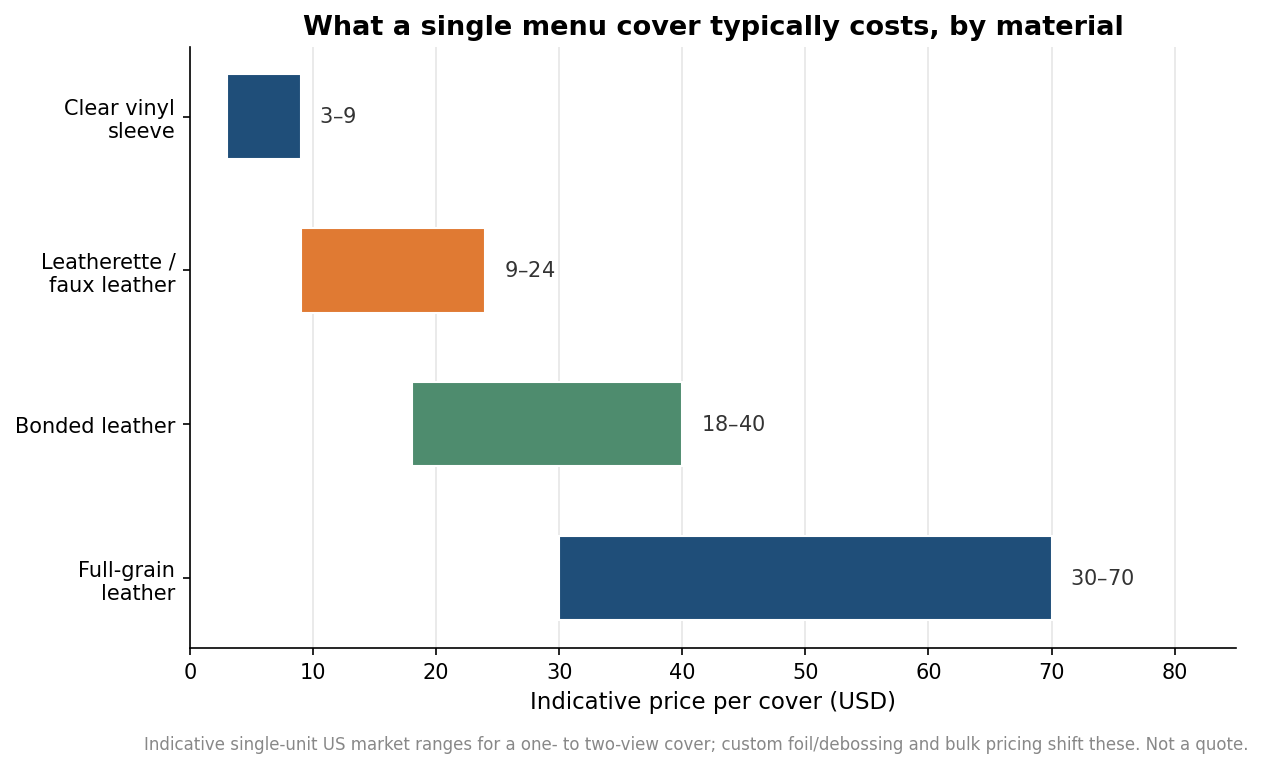
    Price tracks material and view count more than anything else. As a rough guide across the US market, a plain clear vinyl sleeve runs a few dollars, leatherette covers land in the low-to-mid double digits, and genuine leather can reach the price of a small booklet each, with full-grain hides at the top of that band. The ranges below are indicative single-unit figures, not a quote; custom foil stamping, debossing, extra panels, and bulk orders all move them. The two biggest cost multipliers are view count, because each added panel is more material and labor, and decoration, because a foil-stamped or blind-debossed logo adds a setup charge on the first order that then spreads across the quantity you buy.

    Horizontal bar chart of indicative per-cover price ranges for clear vinyl, leatherette, bonded leather, and full-grain leather menu covers
    Indicative US market price per cover by material; custom decoration and bulk orders shift these figures.

    This is why buying in sensible quantity pays off. The one-time setup for a custom logo die is the same whether you order 12 covers or 60, so the per-cover decoration cost falls sharply as the run grows. If you know you will need replacements, ordering the spares up front is almost always cheaper than a second short run later.

    Specifying a custom cover so it’s right the first time

    When you move from a stock cover to a branded one, a few details prevent disappointment. Supply your logo as vector art so a foil die or deboss reproduces cleanly at any size, and decide early between shiny foil, which pops on dark leatherette, and blind deboss, which is subtler and more upscale on leather. Confirm the exact insert size and orientation, since a portrait 8.5 x 14 cover will not hold a landscape sheet. Ask for a physical proof or at least a photo of the first unit before the full run, and build in lead time: custom-decorated covers commonly take on the order of one to three weeks once artwork is approved, longer for genuine leather and large quantities. Nail those points and the cover you get back will match the room you pictured, and it will still look the part after a year of dinner service.